How to Propagate Tulips from Bulbs

If you want more tulips, don’t start with seed. Start with the bulb.
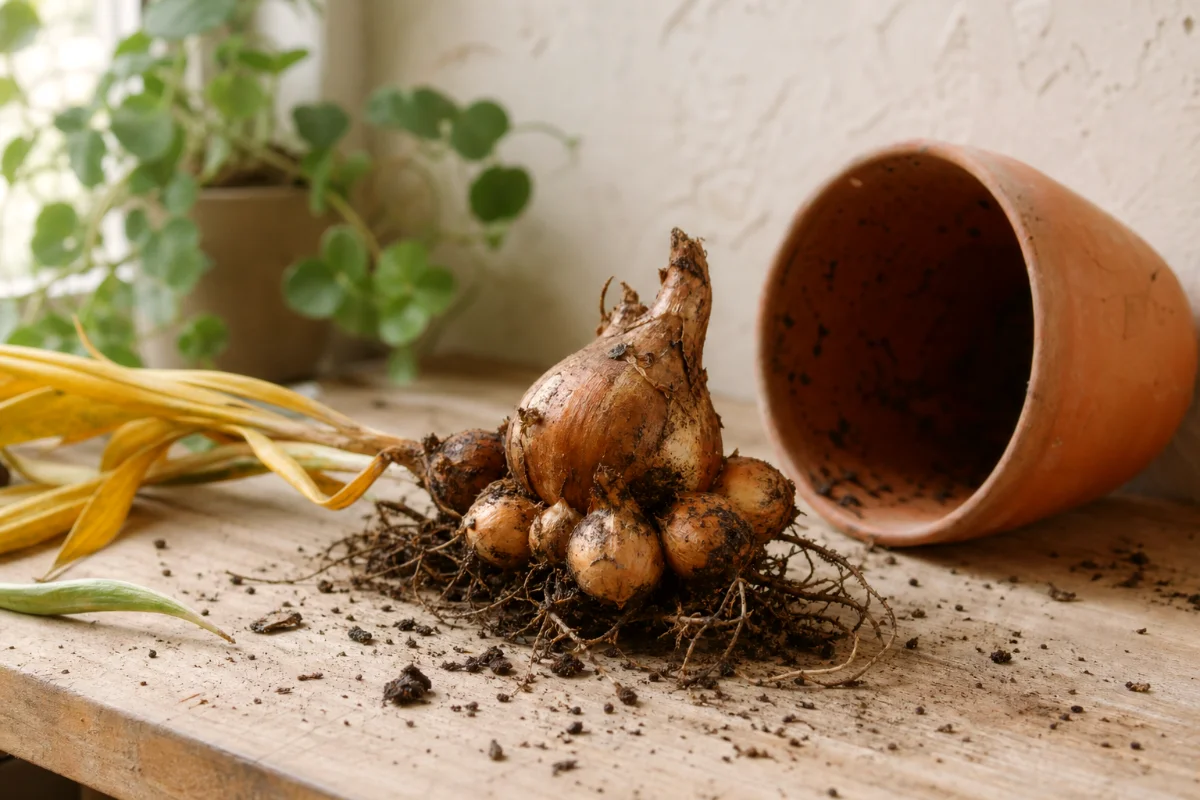
Tulips naturally make small baby bulbs beside the main bulb. Gardeners call these offsets or bulblets. In plain English, they’re little future tulips tucked against the parent bulb.
The best way to propagate tulips is to lift the bulbs in late summer or fall, separate the firm bulblets, and replant them in well-draining soil. That’s it. No fancy lab work. No misting tray on a heat mat. Just good timing, gentle hands, and a bit of patience.
Here’s the catch. Small bulblets won’t always bloom the first spring. Many need 1 to 3 years to reach flowering size. That’s normal, and it’s where many beginners think they failed. They didn’t. Tulips just like to take their sweet time.
When to Propagate Tulips
Lift and divide tulips in late summer or fall, after the foliage turns yellow or brown and dies back.
That yellowing stage matters. While the leaves are green, they’re feeding the bulb. Cut them too soon, or dig too early, and you rob next year’s flower before it even gets a fair shot.
I wait until the leaves look tired, floppy, and frankly a bit ugly. That’s my signal. The bulb has pulled energy back underground, and the plant is ready to rest.
How Often Should You Divide Tulip Bulbs?
Divide tulips every 3 to 5 years, especially if the clump used to bloom well but now sends up leaves with only a few sad flowers.
Overcrowding is a bloom killer. Bulbs packed together fight for space, food, and airflow. The cluster may look full underground, but above ground you get fewer flowers. Been there. It’s annoying.
What You’ll Need
You don’t need much. A basic setup works better than an overcomplicated one.
- Garden fork or hand trowel
- Gloves
- Small bucket or tray
- Compost or bulb-friendly soil amendment
- Coarse sand or fine gravel for heavy, wet soil
- Plant labels
- Firm tulip bulbs with healthy offsets
Use a garden fork if you have one. It loosens soil with less slicing than a sharp spade. Tulip bulbs bruise more easily than beginners expect.
Steps for Propagating Tulips by Offsets
1. Let the Foliage Die Back First
Wait until the tulip leaves turn yellow, tan, or brown. Don’t rush this part.
Green leaves still make food through photosynthesis. The bulb stores that food for next spring’s growth. If you remove the leaves too early, you weaken the bulb and may lose blooms.
2. Lift the Bulb Cluster Carefully
Push your fork or trowel into the soil several inches away from the stem area. Then loosen the soil in a wide circle.
Lift the whole clump gently. If you hit a bulb, don’t panic. But try not to spear the cluster like a potato. Damaged bulbs rot faster in storage and wet soil.
3. Shake Off Loose Soil
Brush away enough soil so you can see the main bulb and the smaller bulblets attached around it.
Don’t scrub the bulbs clean with water unless they’re caked in heavy mud and you plan to dry them well afterward. Damp bulbs sitting in a pile can turn mushy fast.
4. Separate the Bulblets
Gently break the small offsets away from the parent bulb. Use your fingers, not a knife, whenever possible.
Healthy bulblets often pop off with light pressure. If one clings tightly, leave it attached for another season. Forcing it can tear the basal plate, which is the flat root-growing base at the bottom of the bulb.
5. Inspect Every Bulb
Keep only bulbs and bulblets that feel firm.
Discard anything soft, rotten, moldy, badly shriveled, or deeply damaged. I know it hurts to throw away plant material, but one rotten bulb can spoil the party for the rest.
A good tulip bulb feels plump and solid, with a papery outer skin. A small crack in the papery covering usually isn’t a problem. A squishy center is.
6. Replant at the Right Depth
Plant each bulb or bulblet about 3x its own diameter deep. That means a 2-inch bulb goes about 6 inches deep from soil surface to bulb base.
Plant with the pointed end up and the flatter root end down. If a tiny offset looks round and confusing, place it sideways. It’ll usually sort itself out.
7. Space Them Properly
Set tulip bulbs about 5 to 6 inches apart. Give small bulblets room too, even if they look ridiculously tiny.
Good spacing helps prevent overcrowding later. It also improves airflow and gives each bulb enough soil to feed from. Crowded tulips often produce leaves instead of flowers, and nobody plants tulips for leaves alone.
Best Soil for Propagating Tulips
Tulips hate sitting wet. If you remember one thing, remember that.
Plant tulip bulbs in well-draining soil. Loose, crumbly soil lets water move through without drowning the bulb. Heavy clay can work if you improve it, but soggy clay in winter is trouble.
In wet areas, mix in coarse sand, fine gravel, or grit where the bulbs will sit. Don’t create a little bathtub of amended soil inside solid clay, though. Loosen a wider area so water can drain away.
Raised beds help too. So do slopes. A tulip planted where water lingers after rain is living on borrowed time.
Can You Store Tulip Bulblets Before Planting?
Yes, you can store them, but replanting in fall usually gives better results.
If you need to store tulip bulbs or offsets, keep them in a cool, dark, dry place until fall planting time. Use a paper bag, mesh bag, or shallow cardboard box. Skip sealed plastic bags because they trap moisture.
Check stored bulbs now and then. Toss any that soften or smell bad. Your nose will know.
How Long Until Propagated Tulips Bloom?
Large offsets may bloom the next spring. Smaller bulblets usually take 1 to 3 years to reach blooming size.
During that waiting period, let the leaves grow and die back naturally each year. Those leaves build the bulb. It’s not glamorous, but it works.
If a young tulip sends up leaves without a flower, leave it alone. Feed lightly, keep the soil draining well, and let it bulk up.
Should You Propagate Tulips From Seed?
You can propagate tulips from seed. I rarely recommend it for home gardeners.
Seeds often take 4 to 7 years to bloom. And if your tulip is a hybrid, seedlings usually won’t look like the parent plant. That red-and-white fancy tulip may give you something muddy, plain, or completely different.
Seed growing suits breeders and patient experimenters. For beginners who want more of the tulips they already love, offsets make far more sense.
Common Mistakes That Stop Tulips From Multiplying Well
Digging Too Early
If you dig while foliage is still green, you interrupt the bulb’s food-making season. Wait for yellow or brown leaves.
Planting Too Shallow
Shallow bulbs warm up, dry out, and get disturbed more easily. Plant about 3x the bulb’s diameter deep.
Keeping Soft Bulbs
Soft bulbs don’t improve in the ground. They rot, and sometimes they spread rot to nearby bulbs. Be ruthless here.
Planting in Wet Soil
Wet soil causes more tulip losses than cold weather in many gardens. Improve drainage before you blame the bulb.
Ignoring Overcrowding
A tulip clump can look strong for a few years, then start fading. Divide it every 3 to 5 years so the bulbs don’t choke each other out.
My Practical Fall Planting Tips
Plant tulips when the soil has cooled but before it freezes hard. Cool soil helps bulbs root without pushing up tender growth too soon.
I also label every clump. You think you’ll remember. You won’t. Spring feels like a different lifetime once fall cleanup starts.
- Plant in groups of 7 to 12 bulbs for a fuller spring look.
- Keep the biggest bulbs together if you want the strongest bloom display.
- Plant small bulblets in a nursery row if you want to grow them on for a year or two.
- Water once after planting if the soil is dry.
- Hold back heavy fertilizer until roots begin growing.
A nursery row is just a simple holding area. It lets small offsets grow bigger without getting lost among perennials or accidentally chopped during weeding.
A Note on Tulips That Don’t Come Back Strong
Some modern tulips act more like short-term guests than long-term garden residents. Big, frilly, highly bred types may bloom beautifully the first year and then fade.
Darwin hybrids, species tulips, and many botanical tulips usually return and multiply better. If propagation matters to you, choose tulips known for perennial performance.
And yes, even good tulips need leaves after bloom. Hide fading foliage with perennials like catmint, hardy geranium, or lady’s mantle. They fill in as tulip leaves yellow, but they don’t smother the bulbs early in spring.
FAQ
What is the easiest way to propagate tulips?
The easiest method is dividing offsets, also called bulblets, from the parent bulb in fall. Lift the clump after foliage dies back, separate firm bulblets, and replant them.
Can I leave tulip bulbs in the ground and let them multiply?
Yes, tulips can multiply in the ground, especially in well-draining soil. But after 3 to 5 years, crowded clumps often bloom less, so dividing helps keep them productive.
How deep should I plant tulip bulblets?
Plant tulip bulblets about 3x their diameter deep. Small offsets won’t go as deep as full-sized bulbs, and that’s fine.
Do tulip bulblets bloom the first year?
Sometimes, but don’t count on it. Small bulblets often need 1 to 3 years to grow large enough to flower.
Can I propagate tulips in spring?
Spring isn’t the best time. Let the plant bloom and keep its leaves until they yellow. Then lift and divide in late summer or fall.
Why did my divided tulips grow leaves but no flowers?
The bulbs may be too small, planted too shallow, overcrowded, or short on stored energy. Let the foliage die back naturally and give the bulbs another season.
Should I fertilize tulip offsets?
You can add a light bulb fertilizer or compost at planting time. Don’t overdo it. Good drainage and healthy leaves matter more than heavy feeding.