How to Propagate Spider Plant Pups: The Simple Way

Spider plants make more spider plants like it’s their favorite hobby. Those little dangling babies are called pups or plantlets, and they’re the easiest houseplant babies you’ll ever raise.
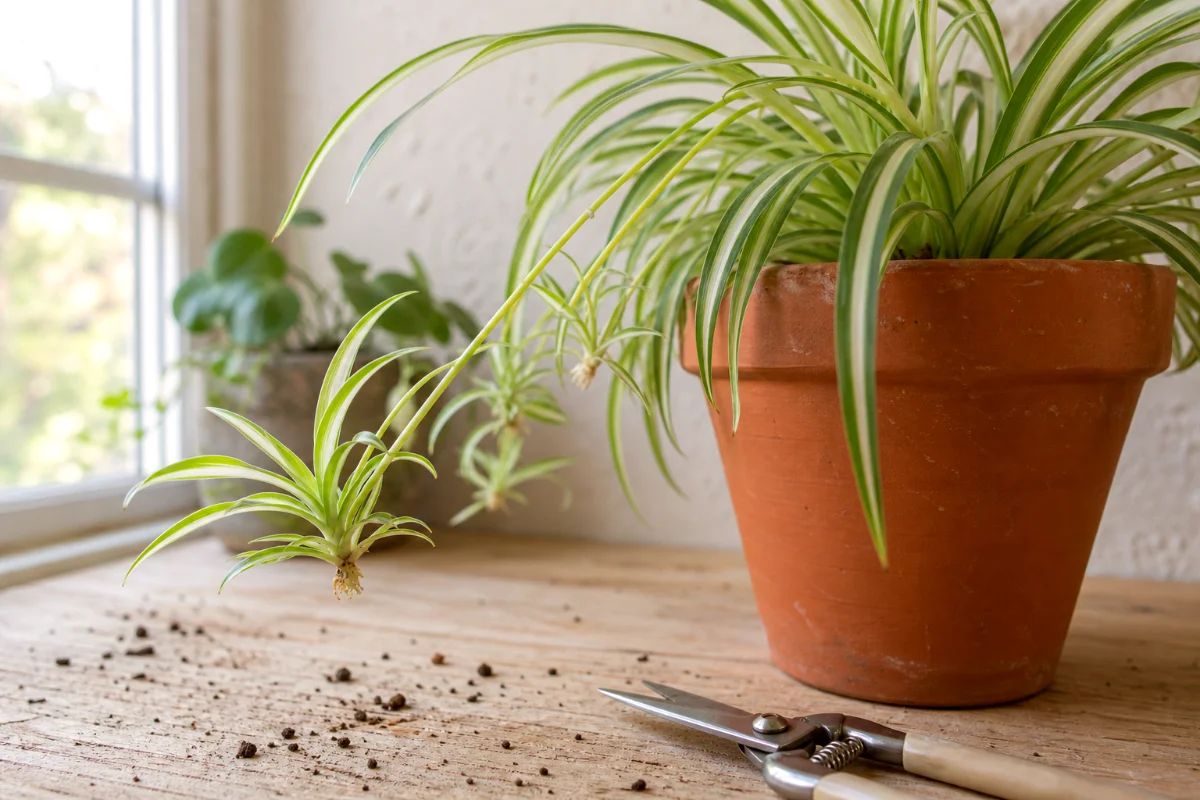
If you want to know how to propagate spider plant pups without making a mess of it, start with this: cut a healthy pup from the long stem, then root it in water or tuck it straight into moist potting soil.
That’s the whole idea. But the small details matter. A pup with tiny brown bumps or little roots at the base will root faster, often in 1 to 2 weeks in water.
Before You Cut: Choose the Right Spider Plant Pup
Don’t grab the tiniest, saddest baby on the stem just because it’s there. Pick a pup that looks ready to live on its own.
I look for firm green leaves, a little size, and those small brownish bumps at the base. Those bumps are root nodules, which are basically roots waiting for an excuse to grow.
- Choose pups with fresh, upright leaves.
- Look for small bumps or pale roots at the base.
- Skip yellow, mushy, or shriveled plantlets.
- Use pups that are at least a couple of inches across when possible.
And yes, you can try a smaller pup. Spider plants forgive a lot. But a stronger pup gives beginners a much better shot.
What You’ll Need
You don’t need fancy gear. Please don’t overbuy for a spider plant. Half the charm of this plant is how little fuss it wants.
- Clean scissors or small pruning snips
- A small glass jar or cup for water propagation
- A small pot with drainage holes
- Fresh, well-draining potting soil
- A paperclip or hairpin if the pup won’t stay put
- Room-temperature water
Wipe your scissors before cutting. Clean tools lower the chance of mushy stems and mystery rot, which always seems to show up when we’re feeling confident.
Method 1: Water Propagation, the Most Common Method
Water propagation wins people over because you can see the roots grow. It’s satisfying. A little addictive, honestly.
Step 1: Snip the Pup from the Stem
Find the long trailing stem that holds the baby spider plant. Cut the pup free with clean scissors, keeping the little base of the plantlet intact.
You don’t need to keep a long piece of the runner attached. The pup roots from its base, not from a dangling stem tail.
Step 2: Place the Base in Water
Set the pup in a small jar so only the base touches the water. Keep the leaves above the waterline.
This part matters. Leaves sitting in water rot fast, and rotting leaves can sour the whole jar before roots get going.
Step 3: Give It Bright, Indirect Light
Place the jar near a bright window, but not in harsh direct sun. Bright indirect light gives the pup energy without cooking it.
If the water turns cloudy, pour it out and add fresh water. Clear water keeps things cleaner around the new roots.
Step 4: Pot It When Roots Reach 1 to 2 Inches
Once the roots reach about 1 to 2 inches long, plant the pup in a small pot of well-draining potting soil. Don’t wait until the roots look like spaghetti.
Long water roots tangle and break easily. Short, healthy roots move into soil with less drama.
Method 2: Soil Propagation, My Favorite for Rooted Pups
Water propagation gets the applause, but soil propagation often makes the stronger plant. There, I said it.
If your spider plant pup already has small roots or brown root bumps, you can plant it directly into moist soil. This skips the awkward water-to-soil change that sometimes makes new plants sulk.
Step 1: Fill a Small Pot with Moist Soil
Use a small pot with drainage holes. Fill it with fresh potting mix that drains well but still holds a little moisture.
A standard indoor potting mix works fine. If it feels heavy, mix in a handful of perlite. Spider plants like moisture, but they hate soggy feet.
Step 2: Plant the Pup’s Base
Make a small hole, place the base of the pup into the soil, and gently firm the mix around it. Don’t bury the leafy crown.
The base needs contact with moist soil. The leaves need air. Keep those two jobs separate and you’ll avoid most problems.
Step 3: Pin It Down if It Wiggles
Some pups flop around like they have better plans. Use a bent paperclip or hairpin to hold the plantlet against the soil.
Good soil contact helps new roots grab on. If the pup keeps lifting, the tiny roots dry out before they can settle.
Step 4: Keep Soil Moist for the First Few Weeks
For the first few weeks, keep the soil consistently moist. Not swampy. Not bone dry. Think wrung-out sponge.
After you see new growth or feel gentle resistance when you tug lightly, ease into normal spider plant watering.
Method 3: Division for a Mature Spider Plant
Division works best when a spider plant has filled its pot and looks crowded. This method gives you larger plants right away, not tiny babies.
It also refreshes an old plant that has turned into a tight root brick. I’ve split plenty of old spider plants that looked tired, then watched every piece perk up in fresh soil.
How to Divide a Spider Plant
- Water the plant the day before, so the roots flex instead of snapping.
- Slide the whole plant out of its pot.
- Gently tease the root ball apart with your fingers.
- Separate it into smaller sections, each with leaves and roots.
- Repot each section into its own container with fresh potting soil.
- Water well and place the divisions in bright, indirect light.
Don’t panic if a few thick roots break. Spider plants grow tough roots, and they usually recover quickly when you give them moisture and light.
Best Time to Propagate Spider Plants
Spring and summer give you the fastest results because the plant is already in growth mode. Warm rooms and longer days help roots form quickly.
But you can propagate spider plants year-round indoors. In fall or winter, expect slower rooting. Be patient and don’t drown the pup trying to speed it up.
Light, Water, and Humidity After Propagation
New spider plant pups need bright, indirect light. Too little light slows root growth. Hot direct sun can scorch the leaves and dry the tiny roots.
Keep the soil lightly moist while roots establish. If the air in your home runs dry, mist the pup now and then, especially if the leaf tips look papery.
Skip fertilizer at first. New roots need to settle before they handle extra salts from plant food.
Common Mistakes That Slow Down Rooting
Spider plants are easy, but beginners still trip over a few sneaky problems. I’ve done most of these myself, so no judgment.
- Submerging the leaves: Only the base belongs in water. Wet leaves rot.
- Using a pup with no base: If you cut off the rooting point, the pup struggles.
- Letting soil dry out too soon: New roots need steady moisture during the first few weeks.
- Planting in a huge pot: Extra soil stays wet too long and can rot the roots.
- Putting pups in direct sun: Bright shade beats harsh sunlight for fresh cuttings.
- Waiting too long in water: Plant water-rooted pups when roots hit 1 to 2 inches.
How Long Does It Take to Propagate a Spider Plant?
In water, spider plant pups with root bumps often show roots within 1 to 2 weeks. Some take a little longer, especially in cooler rooms or lower light.
In soil, you won’t see the roots, so watch the leaves. A pup that stays green, stands firm, and starts pushing new growth has taken hold.
Should You Root the Pup While It’s Still Attached?
You can. This is an old gardener’s trick, and it works beautifully if you have space near the mother plant.
Set a small pot of moist soil beside the parent plant, press the attached pup onto the soil, and pin it down with a paperclip. Once it roots, cut the runner.
This method feeds the pup through the parent plant while it roots. It’s slow, steady, and very forgiving.
FAQ
Can I propagate a spider plant without roots?
Yes. A pup can grow roots even if you don’t see any yet. Still, pups with brown root bumps at the base root faster and fail less often.
Is water or soil better for spider plant propagation?
Water is easiest because you can watch the roots. Soil is often faster for pups that already have root bumps because they don’t need a second move from water to soil.
How often should I change the water?
Change it whenever it looks cloudy. If it stays clear, freshen it every few days to keep the base clean.
When should I move a water-rooted pup to soil?
Move it when the roots measure about 1 to 2 inches long. At that stage, the roots are long enough to drink but not so long that they tangle badly.
Can I propagate spider plants in winter?
Yes, but rooting may take longer. Keep the pup warm, give it bright indirect light, and don’t overwater it out of impatience.
Why is my spider plant pup turning brown?
Brown leaves usually point to dry air, too much direct sun, rot from wet leaves, or soil that went too dry. Check the base first. A firm base gives you hope. A mushy base means start over with a fresh pup.